My wife has been using Apple Reminders for our grocery list. It works, but when you check off eggs for the 10th time and add it back for the 11th time the next week, it feels like a hassle. And if you want to find something in the completed items, you have to scroll through eggs, bread, eggs, bread, orangutan, eggs, bread… So she tried to work around it by not checking off the items, which made the app even messier.
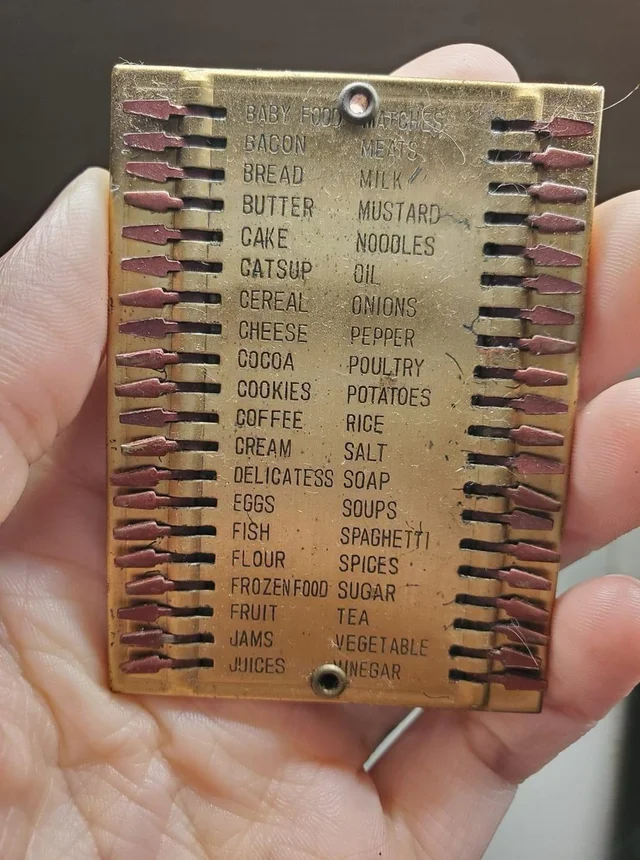
I think a grocery app should be designed differently from a todo list app. Forever ago, I saw this physical grocery list on Reddit, supposedly from the 1950s. And I was like, that’s it. That’s how a grocery list should work. I tried to get other developers to build it by offering it as a free idea. But nobody took it. So fine, I’ll do it myself.
I looked through the item list in the photo. Wait, something’s not right. Enhance. Enhance. What is “catsup”? Turns out it’s just how your grandparents spelled ketchup. I thought okay, I have to name my app Catsup now. Then I drew a very accurate app icon using only the brush tool in like 10 minutes. Then… I spent another week making the UI match the style of the icon. I even created a custom font. This is why you shouldn’t let me near projects with deadlines.
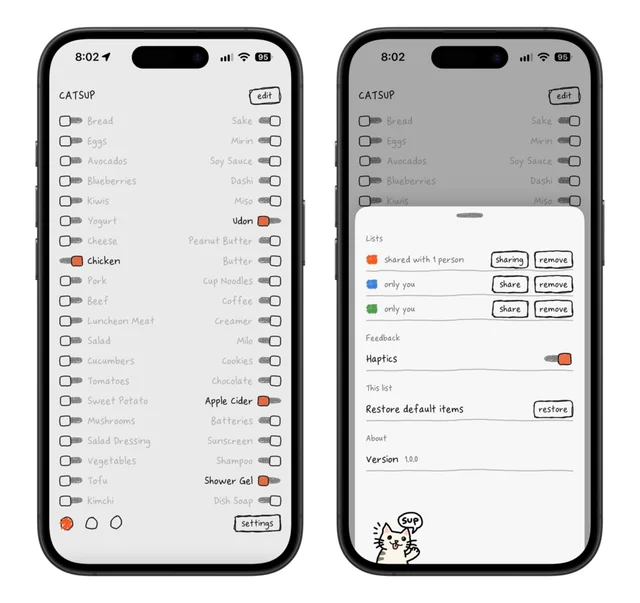
The whole point of the app is that you don’t want bought items to disappear. You want to slide a knob, go buy bread, then slide the knob back. Do you remember how in the original iPhone keynote, Steve Jobs called apps like Stocks and Weather “widgets”? Catsup is a widget. You can swipe between lists like how you swipe between cities in the Weather app. You can only have at most 3 lists with 40 slots each. Because 120 slots ought to be enough for anybody.
The only other feature I wanted was iCloud sharing, so there is iCloud sharing.
There are no categories. If you want to organize the items, just put similar items together. I think spatial memory and muscle memory work better than telling you that an apple is a fruit. I have my commonly bought items on the top left, healthy food on the bottom left, Japanese cooking ingredients on the top right. These days I don’t really need to read the list anymore.
You can’t attach photos. And the item names are limited to 16 characters. I mean I’ve been buying the same brand of peanut butter for 20 years. I don’t need a photo of it or the full name. There are also no notifications, because I take my phone out in the supermarket.
Catsup Privacy Policy
Catsup doesn’t collect, store, or transmit any personal information.
Catsup Pricing
Catsup is available for $3.99 on the App Store. There are no subscriptions, in-app purchases, ads, or tracking. Requires iOS 18+.
If you think about it, everything in your grocery list is probably more expensive than this app.
Catsup Support
If you have any questions, feel free to contact me via email or Mastodon. I read all my emails and Mastodon mentions, but sometimes I’m too socially awkward to reply. Sorry about that in advance.
Let me get you up to speed: Elon Musk took over Twitter and renamed it X and X became a shitty place and Nitter was an alternative X frontend that let you see X content without going to x.com and XCancel was one of the Nitter instances and as they got more popular they got cease-and-desist’d. This is why we can’t have nice things.
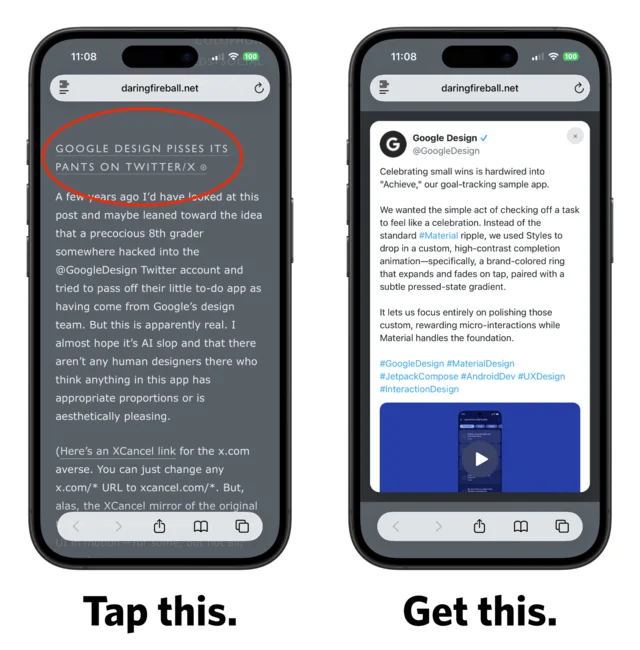
But sometimes people still post X content. Maybe you want to see Gruber roast Google Design. Maybe you want to see posts by Federico Viticci who recently returned to X. So I made Litterbox, a browser extension that opens x.com links in a popup. The idea is you open it, take a look, gag a little, then close the lid.
Notice the little ⊙ after the link. That’s Litterbox saying it can handle this one. Because sometimes people just link to their own profile page and you can’t embed profile pages. (I tried to decorate the link with stink lines, but some sites’ CSP blocks external images. *shakes fist*)
Litterbox doesn’t send your cookies when you open those popups, because of course. It uses the same API X uses for its website embeds. I don’t think they’ll kill the website embed feature. But if they do, it will be very funny.
Litterbox Privacy Policy
Litterbox doesn’t collect, store, or transmit any personal information.
Litterbox Pricing
Litterbox is available for free on the App Store. (Or Chrome. Or Firefox.) There are no subscriptions, in-app purchases, ads, or tracking. Requires iOS 18+ or macOS 15+.
If you want to support me, go buy my other apps. The expensive ones. Teleplayer. History Book. Subscribe to gibber.blog. My wallet will thank your wallet.
Litterbox Support
If you have any questions, feel free to contact me via email or Mastodon. I read all my emails and Mastodon mentions, but sometimes I’m too socially awkward to reply. Sorry about that in advance.
The second law of enshittification states that the total shittiness of a platform must always increase over time. First Reddit started nagging you to install the app. Then they killed the third-party clients. Then they added ads inside comment threads, then AI-generated summaries as “answers”, then a “Get the app to keep using Reddit” overlay you can’t dismiss. Now they’re putting old.reddit.com behind a login wall.
That last one was the anvil that broke the camel’s back. I can’t read Reddit on my phone anymore, so I made yet another Safari extension.
(You might ask, if Reddit is so shitty, why not just stop? Because I don’t use Reddit day to day. It just shows up in my search results. It’s either reddit.com or ai-content-farm.com.)
What It Does
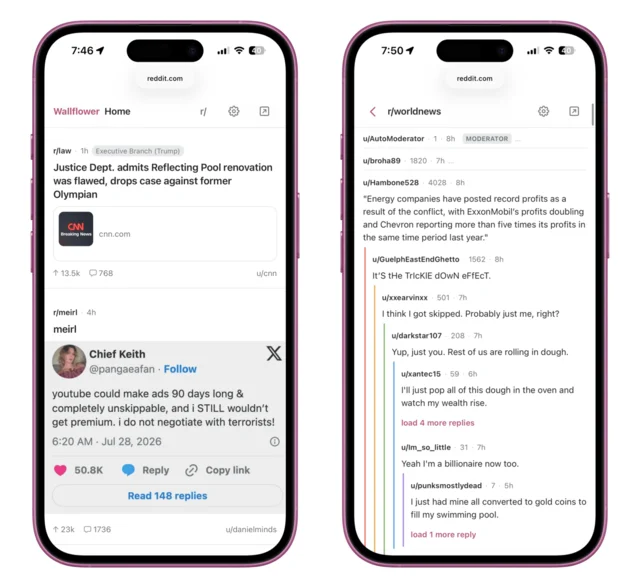
Wallflower replaces Reddit’s web pages with a boring reader. Sound familiar? Because that’s kind of my whole shtick. After years of dealing with crappy websites, I’ve come to realize that it’s often easier to throw the whole thing away and rebuild it. It’s the only way to be sure.
When you land on a Reddit URL, Wallflower hides everything on the page and renders a reader in its place. Because why waste time breaking into a walled garden when you can just grow flowers on the wall.
What the Flowers Look Like
When I said “boring”, I meant it. You get a list of posts that you can scroll. Nested comments that you can collapse and expand. Image galleries that swipe and zoom like they should. All as expected.
There’s no video autoplay, no community highlights, no related posts, no trending anything, no “Join the most real place on the internet”. The whole thing is closer to 2000s Reddit than whatever Reddit is today.
What It Doesn’t Do
When I said “reader”, I also meant it. You can’t comment. You can’t even upvote/downvote.
It’s not meant to be a full-featured Reddit client. So don’t expect feature parity. It’s mostly about making inaccessible pages accessible, and it’s designed to be used without a Reddit account. I’m not a heavy Reddit user, so don’t email me asking me to implement your favorite feature. I probably won’t.
Wallflower Privacy Policy
Wallflower doesn’t collect, store, or transmit any personal information.
Wallflower Pricing
Wallflower is available for $2.99 on the App Store. There are no subscriptions, in-app purchases, ads, or tracking. It’s a universal purchase, so once you buy it, you can use it on all your Apple devices. Requires iOS 18+ or macOS 15+.
Caveat: Reddit has killed a lot of good things. If they decide to kill this one too, there’s nothing I can do about it.
Wallflower Support
If you have any questions, feel free to contact me via email or Mastodon. I read all my emails and Mastodon mentions, but sometimes I’m too socially awkward to reply. Sorry about that in advance.
History Book stores all the saved pages with Core Data, which means there’s an SQLite database somewhere on your Mac. If you want to export those pages somewhere, you can read that database directly.
Disclaimer: This is all undocumented and unsupported by Apple. Only follow this tutorial if you’re comfortable with the terminal.
We only care about 3 files: History.sqlite, History.sqlite-wal, and History.sqlite-shm. SQLite runs this database in write-ahead logging mode, meaning SQLite will write the changes to the -wal file first, then add them to History.sqlite later. So we need all 3 files. Let’s copy them to somewhere safe. Before you copy, quit History Book so all the transactions are committed:
mkdir-p ~/history-book-export
cd ~/history-book-export
cp ~/Library/Group\ Containers/group.com.andadinosaur.HistoryBook/History.sqlite*.
Export to JSON
If you know your SQL well, you can stop reading here. If you don’t, I recommend you export the data into a JSON file first:
sqlite3 -json History.sqlite "
SELECT
Z_PK AS id,
ZTITLE AS title,
ZURL AS url,
ZHOSTNAME AS hostname,
ZSITENAME AS site_name,
ZBYLINE AS byline,
ZEXCERPT AS excerpt,
ZLANG AS lang,
ZDIR AS dir,
datetime(ZSAVEDAT + 978307200, 'unixepoch') AS saved_at,
ZCONTENT AS content
FROM ZPAGE
ORDER BY ZSAVEDAT DESC;
"> pages.json
(I don’t know why the columns are named like that. Core Data chose the column names, not me. The Z prefix has nothing to do with me being Zhenyi.)
I think exporting the data to JSON first is worth it, because almost all programming languages have some nice JSON library. Also because some of you might ignore my advice and won’t copy the SQLite file out first.
Sidenote: WTF is 978307200? Well, Core Data stores dates as seconds since 2001-01-01, and we need to convert it to seconds since 1970-01-01 for unixepoch. I’d rather not do date math manually so here’s a one-liner to calculate that:
Sidenote 2: The command above dumps all the saved pages into a JSON file. If you only want pages in a folder, do this:
sqlite3 History.sqlite "SELECT Z_PK, ZNAME FROM ZFOLDER;"
That gives you the folder’s primary key (Z_PK) for your WHERE ZFOLDER = ? clause.
Reference implementation
Here’s a Ruby script that turns pages.json into HTML files. You should be able to read it and write your own with your favorite language. It’s about 90 lines of code, and most of it is just the inline HTML template.
# run it like this:# ruby export.rb pages.json export/require"json"require"cgi"require"set"require"fileutils"input=ARGV[0]||"pages.json"output=ARGV[1]||"export"# keep the filenames shortMAX_SLUG_BYTES=180# turn-the-titles-into-something-like-thisdefslugify(title)slug=title.to_s.unicode_normalize(:nfc).downcase.gsub(/[^[:alnum:]]+/,"-").delete_prefix("-").delete_suffix("-")truncate_bytes(slug,MAX_SLUG_BYTES).delete_suffix("-")end# titles are utf-8 so don't accidentally split a characterdeftruncate_bytes(string,limit)returnstringifstring.bytesize<=limitstring.each_char.with_object(+"")do|char,kept|breakkeptifkept.bytesize+char.bytesize>limitkept<<charendend# in case 2 articles have the same titledefunique_filename(page,taken)base=slugify(page["title"])base=slugify(page["hostname"])ifbase.empty?base="untitled"ifbase.empty?candidate=basesuffix=1whiletaken.include?(candidate)suffix+=1candidate="#{base}-#{suffix}"endtaken<<candidatecandidateenddefdocument(page)# how we do things in railsh=->(value){CGI.escapeHTML(value.to_s)}<<~HTML
<!doctype html>
<html lang="#{h[page["lang"]||"en"]}" dir="#{h[page["dir"]||"auto"]}">
<head>
<meta charset="utf-8">
<meta name="viewport" content="width=device-width, initial-scale=1">
<base href="#{h[page["url"]]}">
<title>#{h[page["title"]]}</title>
<style>
body { max-width: 42rem; margin: 4rem auto; padding: 0 1.5rem;
font: 1rem/1.6 system-ui, sans-serif; }
img, video, figure { max-width: 100%; height: auto; }
pre { overflow-x: auto; }
.meta { color: #666; font-size: 0.875rem; }
</style>
</head>
<body>
<article>
<h1>#{h[page["title"]]}</h1>
<p class="meta">
#{h[[page["byline"],page["site_name"],page["saved_at"]].compact.join(" · ")]}<br>
<a href="#{h[page["url"]]}">#{h[page["url"]]}</a>
</p>
#{page["content"]}
</article>
</body>
</html>
HTMLendpages=JSON.parse(File.read(input))FileUtils.mkdir_p(output)taken=Set.newpages.eachdo|page|name=unique_filename(page,taken)File.write(File.join(output,"#{name}.html"),document(page))endputs"Wrote #{pages.size} files to #{output}"
By far the most requested feature for History Book is some way to automate exporting saved webpages, so users can import them into other archival services or Obsidian or whatever.
I added a simple export feature ages ago, but the SwiftUI modifier is very limited. When you’re exporting multiple files, you can’t even specify the file names. So you end up with names like Exported HTML text 1.html.
I tried adding AppleScript support to History Book, but I could never seem to get it right. I couldn’t find much information online. Even Apple’s. Especially Apple’s. It seems like a lost art.
My limited understanding is that to implement AppleScript support, you need to create an .sdef file, add a few keys to Info.plist, then implement a KVC object graph for everything you want to script, including NSApplication. Then you need to implement objectSpecifier for all the exposed objects.
Then when you actually try it, you realize you can’t just do it on the NSManagedObject classes. You’d have to write wrapper classes. I don’t know how many hours I wasted debugging the KVC plumbing, or trying different things with the .sdef file. I was never quite sure if I’d done it right.
Then if you sell your app on the App Store, the app is sandboxed. And I don’t know how to nicely get a sandboxed app to write to an arbitrary path. You can (I think) work around that with some entitlements, but there’s no guarantee App Review will approve them. Even if they do, the user experience is still stupid. You still have to tell the user to go to Settings, click this button, click that button.
Then I thought about App Intents. With Shortcuts you can get 80% of the way there with very little code. But you need macOS 13, and History Book still runs on macOS 12. Raising the deployment target will cut off Macs like the Intel MacBook Pros. So that’s out as well.
So my last resort is to find the SQLite file Core Data writes to, and write a tutorial about how to export the data from there. I never got around to writing it, until now. So here goes.
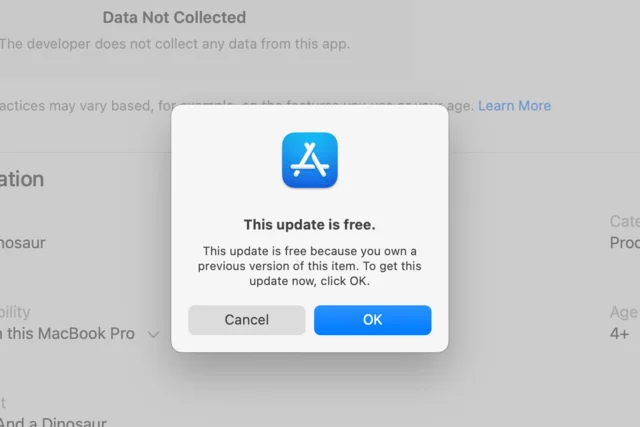
You’ve probably seen this before. You bought an app, then for some reason you deleted it. Later, when you tried to redownload it from the App Store, the button shows the price (like “$0.99”) instead of showing the redownload icon.
This bug has been around for at least 11 years. Usually it’s because you’ve hidden the purchase, or the app was shared through Family Sharing. If you click the price button anyway, you’ll see a dialog telling you that you’ve already purchased the app and can download it for free.
Some of us learned about this and just lived with it. Accepted it as another part of Apple’s declining software quality. But not everyone knows. So when users see that price button, they contact the developers. Like contacting a website’s owner because your internet is down.
As developers, we can’t do anything about it. We can explain the glitch to the users and say “trust us”, or we can tell them to contact Apple if they’d rather verify for themselves.
The funny thing is, Apple Support will often redirect the user back to us. “The developer will take care of it.” But we can’t take care of it. It’s something only Apple can do.
If you’re still reading and aren’t sure what to do, just make sure you’re using the same Apple ID and click the price button. You won’t be charged. If you want this fixed properly, report it to Apple at apple.com/feedback.
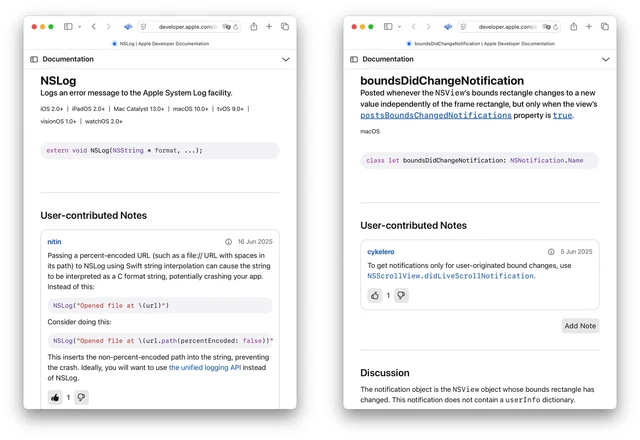
Technotes is a browser extension that adds user-contributed notes to the Apple documentation website. It lets developers include extra explanations, sample code, and warnings right on the pages.
Users can upvote helpful notes and downvote unhelpful ones, and notes that receive too many downvotes will disappear. If you’d like to learn more, read the origin story in this blog post.
Technotes only becomes more useful as more developers join. Your help spreading the word makes a big difference. If you develop for Apple platforms, please download the extension for Safari, Firefox or Chrome and post your first Technote.
Technotes Pricing
Technotes is free. There’s no catch, no creepy business model, and no ulterior motive.
Technotes Privacy Policy
Technotes will never sell or trade your data. Email is used only to manage your account. Logs are deleted after 7 days and cookies are used only to keep you logged in. You own every note you post. Read the full privacy policy.
Technotes Support
If you have suggestions or ideas, feel free to contact me via email or Mastodon. I will try to read every message and consider all feedback, but I may not be able to reply to each one. Thanks for understanding.
After reading about the in-house analog cable channel project, I thought I’d do something similar for the next Chinese New Year when my relatives come over. Since I don’t have the engineering skills to follow the cable channel project, I figured I’d just AirPlay a bunch of videos to the TV.
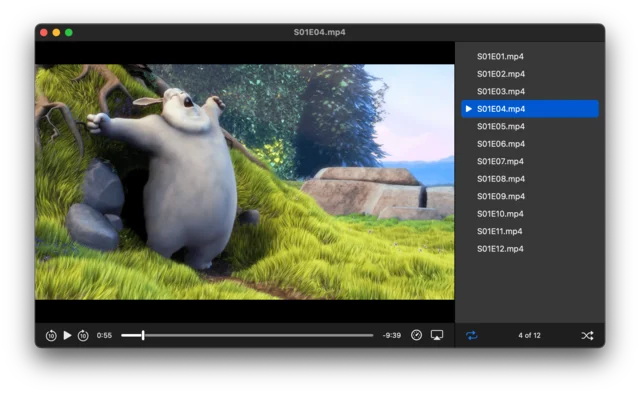
For some reason, QuickTime Player can’t play multiple videos as a playlist, and VLC and IINA don’t support AirPlay. So I thought, how hard can it be to make my own video player? Turns out, it’s pretty hard:
It’s Big Buck Bunny. It’s always Big Buck Bunny.
Teleplayer is a video player with one main purpose, which is to AirPlay a list of videos to an Apple TV.
If you have a collection of TV shows, you can create your own personalized TV channel. If you have music videos, you can recreate the old MTV channel. Or you can turn your homemade videos into a screensaver to play when you aren’t watching anything.
To keep things simple, I use the system video player and only play video formats Apple TV supports natively. Teleplayer doesn’t use mpv for playback or FFmpeg to transcode videos on the fly. This means it can’t play mkv or avi videos, but you can use Subler to convert mkv to mp4 and Handbrake for other formats. So no big deal.
During AirPlay, if your Mac goes to sleep, the playback stops. To prevent this, Teleplayer will keep your Mac awake while the app is running.
Apps like this usually come with a remote app for iOS. But I wanted to avoid a clunky companion app and just use the Apple TV remote. With Teleplayer, you can scrub to the end of a video to skip to the next one or rewind twice at the start to go back to the previous one. Here’s how it works:
Other than that, the app has no features. It doesn’t even have a settings screen. Don’t expect it to have feature parity with other video players. It works pretty well for what I need, though. Give it a try. I hope you find it useful.
Teleplayer Pricing
Teleplayer is available for $9.99 on the App Store. There are no subscriptions, in-app purchases, ads, or tracking.
Teleplayer Privacy Policy
Teleplayer doesn’t collect, store, or transmit any personal information.
Teleplayer Support
If you have any questions, feel free to contact me via email or Mastodon. I read all my emails and Mastodon mentions, but sometimes I’m too socially awkward to reply. Sorry about that in advance.
Spool is a Safari extension that adds a few features to the Threads web app.
With Spool, you can set Following as your default timeline. You can also filter posts from certain users (e.g. engagement farmers) or based on keywords (e.g. engagement bait).
Threads like to show me posts from complete strangers, but I think it’s rude to mute them. So, instead of hiding posts completely, I added a reveal button to show filtered posts. (Filters are saved in iCloud, so sometimes you have to quit and reopen Safari for the new filters to take effect.) Spool also removes the l.threads.net redirect tracking when you click on an external link.
Since Safari extensions don’t work on web apps added to your iPhone or iPad home screen, the mobile version of Spool lets you turn the app into a simple Threads browser, with your settings intact.
If you use Threads but don’t like their approach to maximizing engagement, give Spool a try. I hope you find it useful.
Spool Pricing
Spool is available for $1.99 on the App Store. There are no subscriptions, in-app purchases, ads, or tracking. It’s a universal purchase, so once you buy it, you can use it on all your Apple devices.
Spool Privacy Policy
Spool doesn’t collect, store, or transmit any personal information. But since this is about Threads, you might want to check out their privacy policy.
Spool Support
If you have any questions, feel free to contact me via email, Mastodon, or Threads. I read all my emails and social media mentions, but sometimes I’m too socially awkward to reply. Sorry about that in advance.
If you think about it, using passwords to log in is really weird.
When you sign up, you’re basically shouting a secret word over the ether to the server. The server hears your word, writes it down, and stores it.
Then when you want to log in, you shout your secret word to the server again. The server hears the word, writes it down, and checks it against their note. If it matches, you’re logged in.
At this point, I hope you find it as weird as I do: shouting my word every time I log in? How is that “secret”? What happens if someone else hears it? What happens if someone hacks into the server and steals the notes? What happens if someone tricks you into telling them the word?
We can solve some of these problems by making our secret word complicated and hard to pronounce. To prevent people from overhearing it, we can whisper it over a walkie-talkie. To stop hackers, the server can write their notes with a handwriting so ugly it’s unrecognizable by anyone. But if you get tricked and give your secret word to some baddies… we don’t have a good solution.
I mean sure, let’s be vigilant and always on the lookout for baddies. But what if the baddies are really good at pretending to be trustworthy? Then it’s hard to say. Even security experts come close to falling for that.
Enter Passkeys
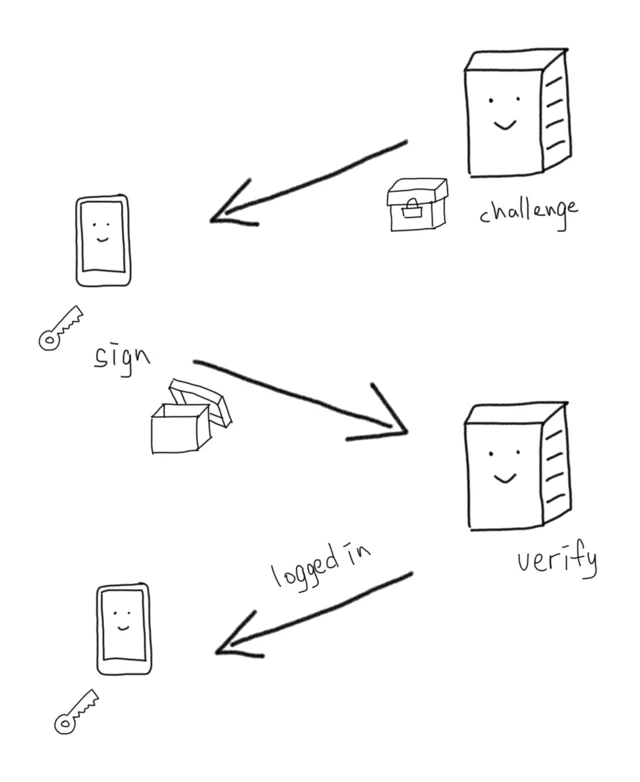
Passkeys are designed to solve these problems. With passkeys, the sign-up and login flow differ a bit. When you sign up, you create a key and a lock (digitally, of course) and only pass the lock to the server.
When you log in, the server locks a box with your lock and gives it to you. You unlock the box with your key and send it back. The server then checks if the box’s contents match what it had before. If they do, you’re logged in.
Notice how in both the sign-up and login flows, your key never leaves your house. You’re unlocking the box in the safety of your house, so you never have to worry about baddies. If baddies try to trick you into handing over your keys, well, your key never leaves your house, so you wouldn’t even know how to give it to them.
The makers of passkeys are thinking one step ahead. What if someone breaks into your house? To solve this, they put your keys inside a strongbox in your house, out of reach of everyone, even you. You can use the keys by scanning your face at the strongbox, and the rest is taken care of.
This made some people uneasy. If my keys are out of my reach, are they even mine? What if I own multiple houses, or move house? Don’t worry, the strongbox is magic and will be teleported to your new house. What if I own a different type of house that comes with a different type of strongbox? Don’t worry, you can create separate pairs of keys and locks for each of your houses. And I heard the passkey makers are coming up with a way to move keys between different types of strongboxes, too.
Some people are still unhappy. They don’t want to use the strongboxes that came with their houses. What if I get chased out of my house for some reason? What if I want to live in a cave?
I don’t know. Does the spec forbids you from creating a blueprint of your own strongbox
that hide your keys under your pillow, which you can control, and bring with you wherever you move?



 It’s Big Buck Bunny. It’s always Big Buck Bunny.